Kubernetesのヘルスチェック#
Kubernetesにはコンテナへのヘルスチェック(Probe)が用意されている。
- LivenessProbe
- ReadinessProbe
この2種類のProbeの役割について見ていこう。
LivenessProbeについて#
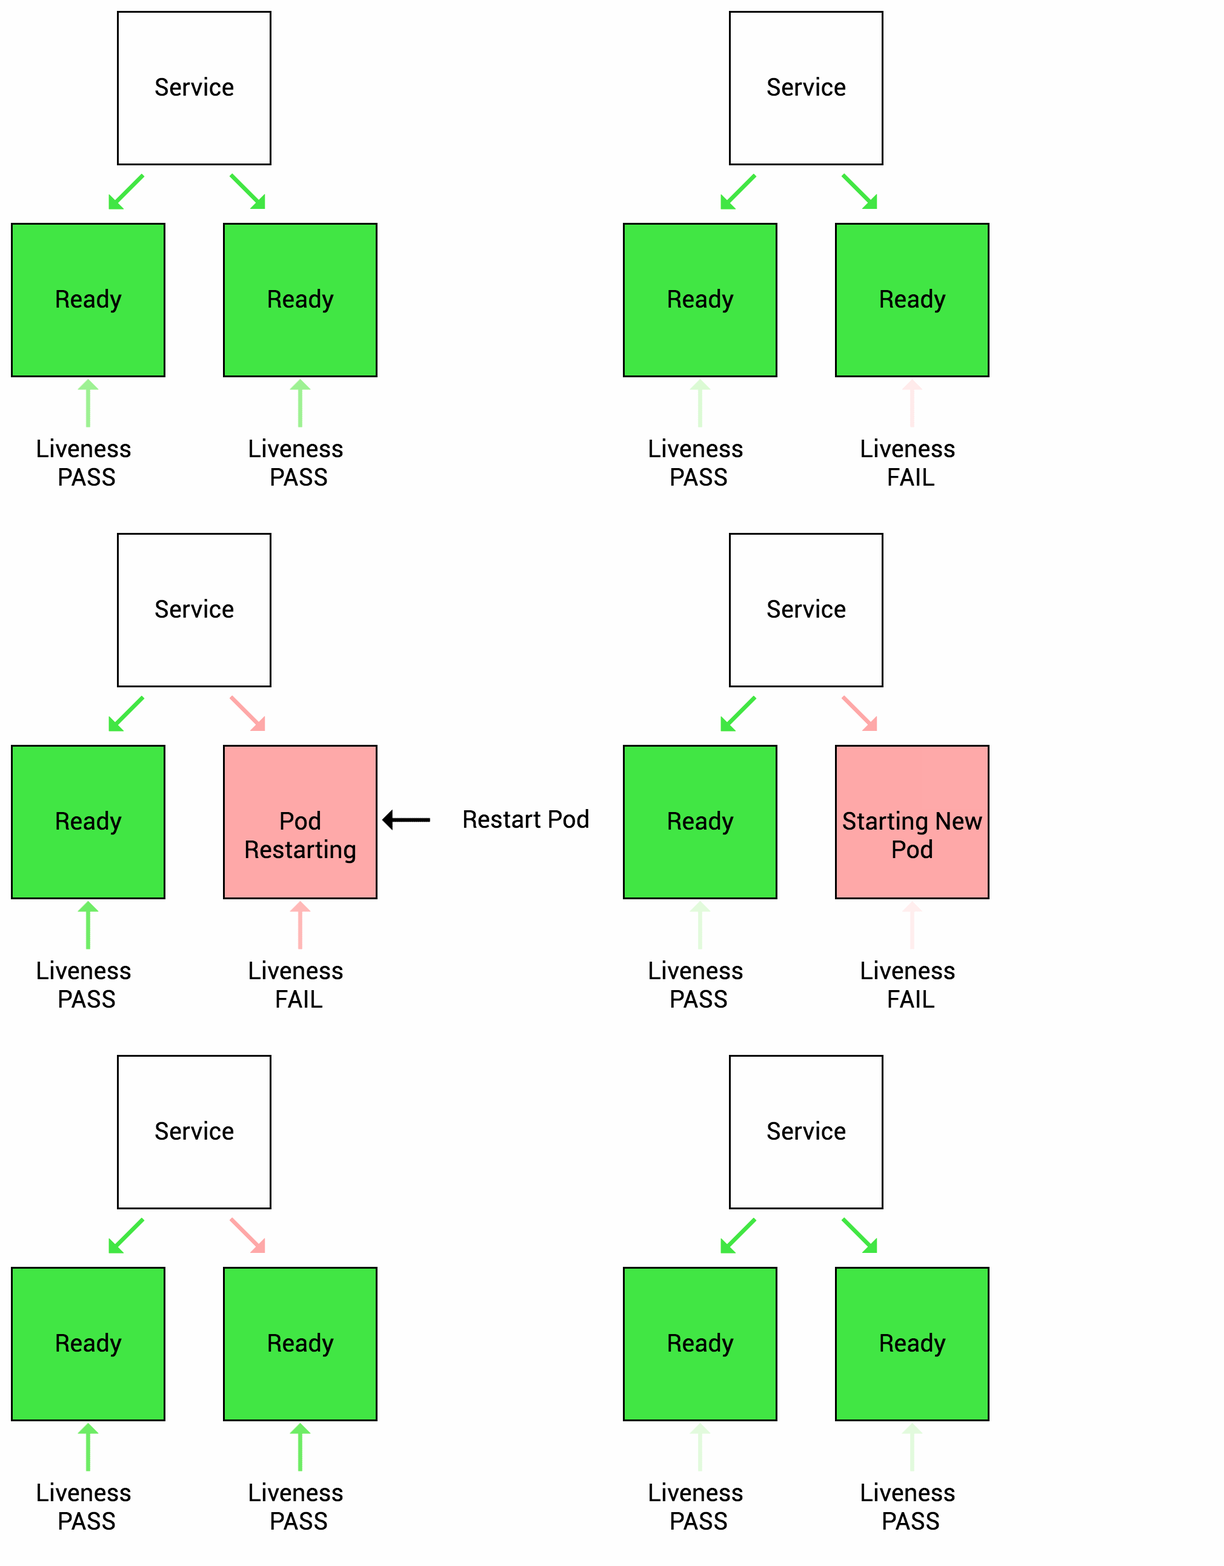
LivenessProbeはコンテナが生存しているかをチェックする。 例えばアプリケーションが応答できなくなった際などを想定している。
このLivenessProbeが通らなくなった場合、コンテナは再作成される。
以下のようなイメージになる。

ReadinessProbeについて#
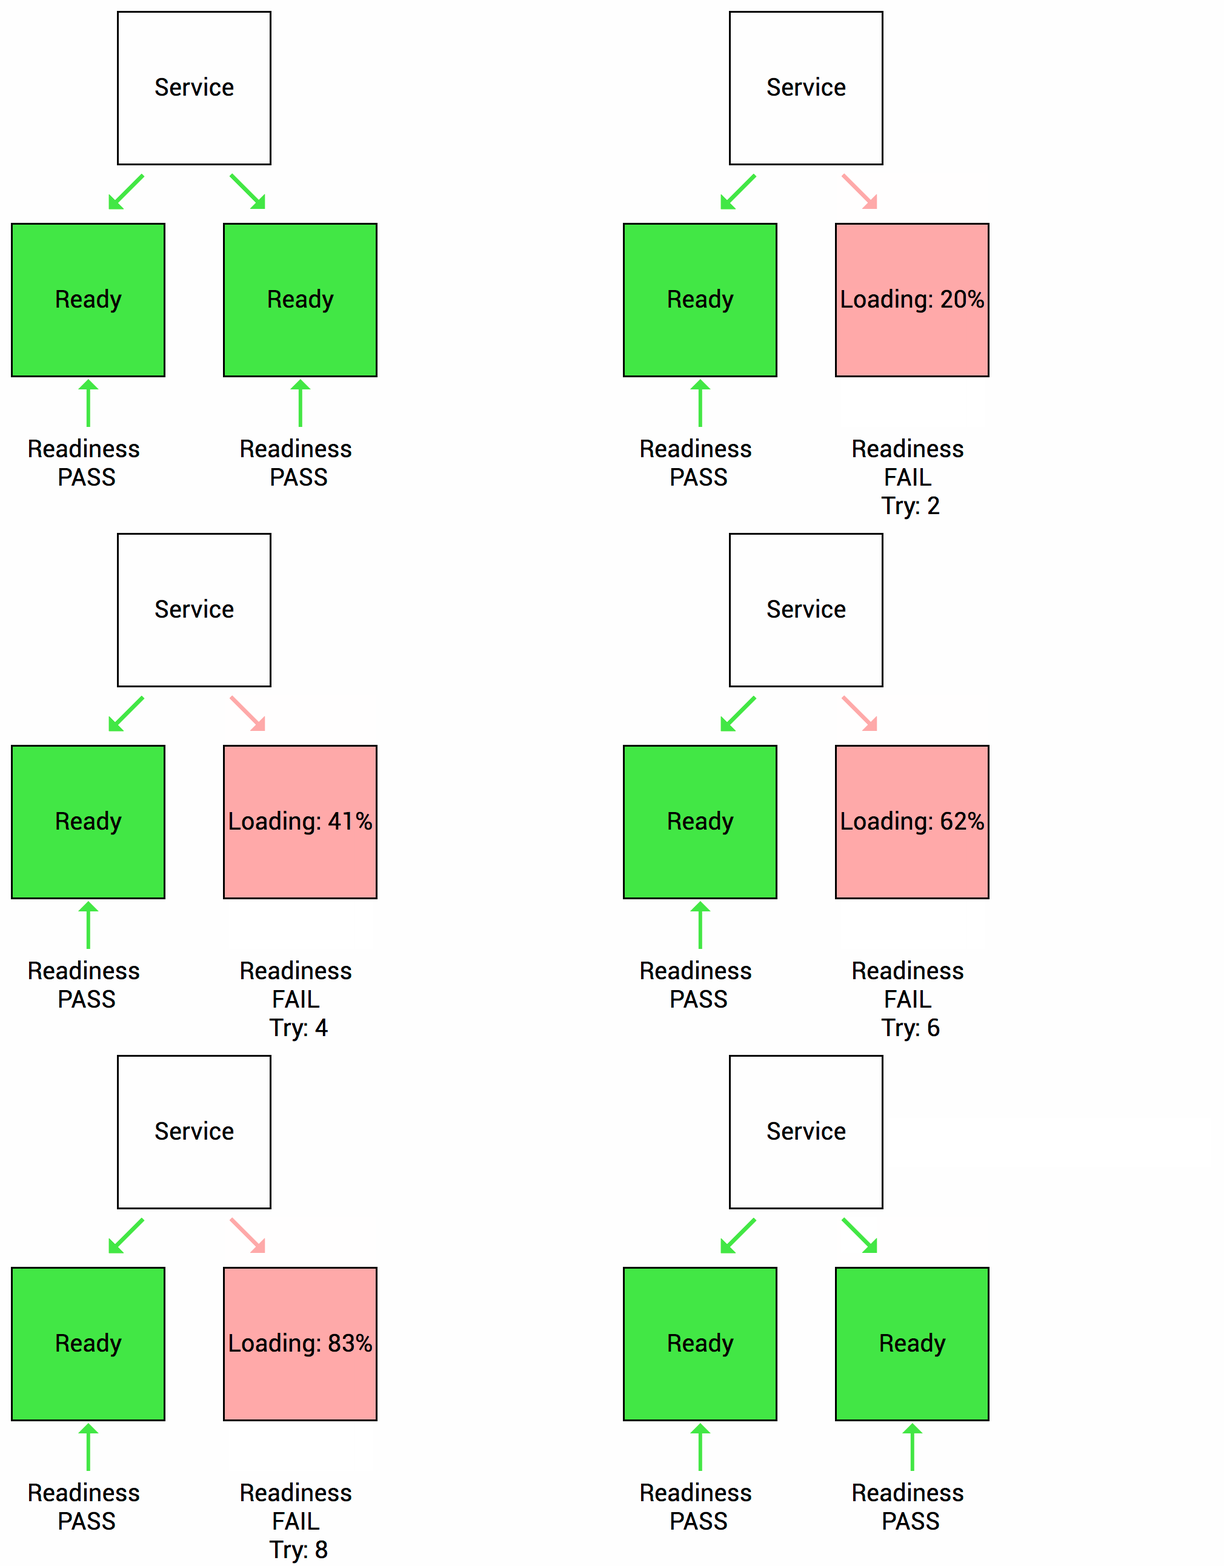
ReadinessProbeはコンテナが準備できている(Ready)状態になっているかチェックする。 例えば初期のロード処理や重いリクエストの処理中で別のリクエストが返せない場合などを想定している。
このReadinessProbeが通らなくなった場合、Serviceからのルーティングの対象から外される。
以下のようなイメージになる。

Probeの種類#
Probeの手段として3つが提供されている。
exechttpGettcpSocket
exec#
exec はコンテナ内でコマンドを実行する。 command にリストでコマンドを指定する。
コマンドの終了ステータスが0の場合はhealthy、0以外の場合unhealthyとして扱われる。
例は以下の通り。
exec:
  command: ["test", "-e", "/config"]
httpGet#
httpGet はHTTPのGETリクエストを発行する。
リクエストのレスポンスステータスが200から300番台の場合はhealthy、それ以外の場合unhealthyとして扱われる。
host: 接続先を指定する。デフォルトはPodのIPアドレスだ。必要な場合 httpHeaders で Host ヘッダーを指定する。httpHeaders: リクエストの際のヘッダーを指定。 name にヘッダー名、 value に値を指定する。path: リクエストのPathを指定する。port: リクエストの際のPortを指定する。ポート番号か名前付きのポートの名前を指定する。scheme: 接続する際のスキームを指定する。 HTTP か HTTPS を指定。デフォルトは HTTP 。
例は以下の通り。
httpGet:
  path: /healthz
  port: 8080
  httpHeaders:
  - name: Host
    value: www.example.local
tcpSocket#
tcpSocket はTCPのコネクションをオープンできるかをチェックする。
コネクションが確立できた場合はhealthy、できなかった場合はunhealthyとして扱われる。
host: 接続先を指定する。デフォルトはPodのIPアドレスだ。port: リクエストの際のPortを指定する。ポート番号か名前付きのポートの名前を指定する。
例は以下の通り。
tcpSocket:
  port: 6379
その他のパラメータ#
initialDelaySeconds: コンテナが開始してからProbeを行うまでの初期遅延を秒単位で指定する。timeoutSeconds: Probeのタイムアウトを秒単位で指定する。デフォルトは1秒だ。periodSeconds: Probeの間隔を秒単位で指定する。デフォルトは10秒で最小の値は1秒だ。successThreshold: Probeが成功したと判断する最小回数を指定。デフォルトは1回だ。failureThreshold: Probeが失敗したと判断する最小回数を指定。デフォルトは3回だ。
Probeを使ってみる#
LivenessProbeを使ってみる#
以下のようなPodを作ってみる。
apiVersion: v1
kind: Pod
metadata:
  name: liveness-check
spec:
  containers:
  - image: nginx
    name: nginx
    livenessProbe:
      httpGet:
        port: 80
        path: /
      failureThreshold: 5
      periodSeconds: 5
Manifestを適用してみよう。
$ kubectl apply -f liveness-check.yaml
pod "liveness-check" created
ここで作成したPodのDescribeを見てみる。 kubectl describe で確認できる。
$ kubectl describe po/liveness-check
Name:               liveness-check
Namespace:          default
Priority:           0
PriorityClassName:  <none>
Node:               minikube/10.0.2.15
Start Time:         Mon, 10 Dec 2018 20:43:58 +0900
Labels:             <none>
Annotations:        kubectl.kubernetes.io/last-applied-configuration={"apiVersion":"v1","kind":"Pod","metadata":{"annotations":{},"name":"liveness-check","namespace":"default"},"spec":{"containers":[{"image":"ngin
x","liv...
Status:             Running
IP:                 172.17.0.2
Containers:
  nginx:
    Container ID:   docker://b7eccef5eb68b2876ee449dbe3e178ba91f022c048e3160d96f9b35df74059eb
    Image:          nginx
    Image ID:       docker-pullable://nginx@sha256:5d32f60db294b5deb55d078cd4feb410ad88e6fe77500c87d3970eca97f54dba
    Port:           <none>
    Host Port:      <none>
    State:          Running
      Started:      Mon, 10 Dec 2018 20:44:02 +0900
    Ready:          True
    Restart Count:  0
    Liveness:       http-get http://:80/ delay=0s timeout=1s period=5s #success=1 #failure=5
    Environment:    <none>
    Mounts:
      /var/run/secrets/kubernetes.io/serviceaccount from default-token-zr2xd (ro)
Conditions:
  Type              Status
  Initialized       True
  Ready             True
  ContainersReady   True
  PodScheduled      True
Volumes:
  default-token-zr2xd:
    Type:        Secret (a volume populated by a Secret)
    SecretName:  default-token-zr2xd
    Optional:    false
QoS Class:       BestEffort
Node-Selectors:  <none>
Tolerations:     node.kubernetes.io/not-ready:NoExecute for 300s
                 node.kubernetes.io/unreachable:NoExecute for 300s
Events:
  Type    Reason     Age   From               Message
  ----    ------     ----  ----               -------
  Normal  Scheduled  1m    default-scheduler  Successfully assigned default/liveness-check to minikube
  Normal  Pulling    1m    kubelet, minikube  pulling image "nginx"
  Normal  Pulled     1m    kubelet, minikube  Successfully pulled image "nginx"
  Normal  Created    1m    kubelet, minikube  Created container
  Normal  Started    1m    kubelet, minikube  Started container
重要な部分は以下の部分。
Liveness: http-get http://:80/ delay=0s timeout=1s period=5s #success=1 #failure=5
LivenessProbeが設定できていることがわかる。
さて、 /usr/share/nginx/html/index.html を削除してみよう。
$ kubectl exec liveness-check -- rm /usr/share/nginx/html/index.html
Describeを確認するとProbeが失敗しているのがわかる。
$ kubectl describe po/liveness-check | tail
                 node.kubernetes.io/unreachable:NoExecute for 300s
Events:
  Type     Reason     Age   From               Message
  ----     ------     ----  ----               -------
  Normal   Scheduled  23s   default-scheduler  Successfully assigned default/liveness-check to minikube
  Normal   Pulling    23s   kubelet, minikube  pulling image "nginx"
  Normal   Pulled     19s   kubelet, minikube  Successfully pulled image "nginx"
  Normal   Created    19s   kubelet, minikube  Created container
  Normal   Started    19s   kubelet, minikube  Started container
  Warning  Unhealthy  1s    kubelet, minikube  Liveness probe failed: HTTP probe failed with statuscode: 403
しばらくするとコンテナが再作成される。
$ kubectl describe po/liveness-check | tail
Events:
  Type     Reason     Age                From               Message
  ----     ------     ----               ----               -------
  Normal   Scheduled  1m                 default-scheduler  Successfully assigned default/liveness-check to minikube
  Normal   Pulling    39s (x2 over 1m)   kubelet, minikube  pulling image "nginx"
  Warning  Unhealthy  39s (x5 over 59s)  kubelet, minikube  Liveness probe failed: HTTP probe failed with statuscode: 403
  Normal   Killing    39s                kubelet, minikube  Killing container with id docker://nginx:Container failed liveness probe.. Container will be killed and recreated.
  Normal   Pulled     36s (x2 over 1m)   kubelet, minikube  Successfully pulled image "nginx"
  Normal   Created    36s (x2 over 1m)   kubelet, minikube  Created container
  Normal   Started    36s (x2 over 1m)   kubelet, minikube  Started container
これがLivenessProbeの動きだ。LivenessProbeが失敗するとコンテナがKillされ、再度作成されて起動してくる。
ReadinessProbeを使ってみる#
以下のようなPodを作ってみる。
apiVersion: v1
kind: Pod
metadata:
  name: readiness-check
  labels:
    app: nginx
spec:
  containers:
  - image: nginx
    name: nginx
    readinessProbe:
      httpGet:
        port: 80
        path: /
      failureThreshold: 1
      periodSeconds: 1
Manifestを適用してみよう。
$ kubectl apply -f readiness-check.yaml
pod "readiness-check" created
そしてこのPodにルーティングするServiceを作成する。
apiVersion: v1
kind: Service
metadata:
  name: readiness-check-svc
spec:
  selector:
    app: nginx
  ports:
  - port: 80
上記のManifestを作成する。
$ kubectl apply -f readiness-check-svc.yaml
service "readiness-check-svc" created
DescribeでPodを確認してみよう。
$ kubectl describe po/readiness-check
Name:               readiness-check
Namespace:          default
Priority:           0
PriorityClassName:  <none>
Node:               minikube/10.0.2.15
Start Time:         Mon, 10 Dec 2018 21:07:07 +0900
Labels:             <none>
Annotations:        kubectl.kubernetes.io/last-applied-configuration={"apiVersion":"v1","kind":"Pod","metadata":{"annotations":{},"name":"readiness-check","namespace":"default"},"spec":{"containers":[{"image":"nginx","na...
Status:             Running
IP:                 172.17.0.2
Containers:
  nginx:
    Container ID:   docker://aec2021f817fa9b8ee38b054545726a7f85bb00c09dd03f3e203b04a51487ed7
    Image:          nginx
    Image ID:       docker-pullable://nginx@sha256:5d32f60db294b5deb55d078cd4feb410ad88e6fe77500c87d3970eca97f54dba
    Port:           <none>
    Host Port:      <none>
    State:          Running
      Started:      Mon, 10 Dec 2018 21:07:11 +0900
    Ready:          True
    Restart Count:  0
    Readiness:      http-get http://:80/ delay=0s timeout=1s period=1s #success=1 #failure=1
    Environment:    <none>
    Mounts:
      /var/run/secrets/kubernetes.io/serviceaccount from default-token-zr2xd (ro)
Conditions:
  Type              Status
  Initialized       True
  Ready             True
  ContainersReady   True
  PodScheduled      True
Volumes:
  default-token-zr2xd:
    Type:        Secret (a volume populated by a Secret)
    SecretName:  default-token-zr2xd
    Optional:    false
QoS Class:       BestEffort
Node-Selectors:  <none>
Tolerations:     node.kubernetes.io/not-ready:NoExecute for 300s
                 node.kubernetes.io/unreachable:NoExecute for 300s
Events:
  Type    Reason     Age   From               Message
  ----    ------     ----  ----               -------
  Normal  Scheduled  2m    default-scheduler  Successfully assigned default/readiness-check to minikube
  Normal  Pulling    2m    kubelet, minikube  pulling image "nginx"
  Normal  Pulled     2m    kubelet, minikube  Successfully pulled image "nginx"
  Normal  Created    2m    kubelet, minikube  Created container
  Normal  Started    2m    kubelet, minikube  Started container
ReadinessProbeが設定されているのが確認できる。
Serviceから説得できるか確認してみよう。
/ # wget -O - -T 1 readiness-check-svc
Connecting to readiness-check-svc (10.105.40.233:80)
<!DOCTYPE html>
<html>
<head>
<title>Welcome to nginx!</title>
<style>
    body {
        width: 35em;
        margin: 0 auto;
        font-family: Tahoma, Verdana, Arial, sans-serif;
    }
</style>
</head>
<body>
<h1>Welcome to nginx!</h1>
<p>If you see this page, the nginx web server is successfully installed and
working. Further configuration is required.</p>

<p>For online documentation and support please refer to
<a href="http://nginx.org/">nginx.org</a>.<br/>
Commercial support is available at
<a href="http://nginx.com/">nginx.com</a>.</p>

<p><em>Thank you for using nginx.</em></p>
</body>
</html>
-                    100% |**************************|   612   0:00:00 ETA
/ # exit
Session ended, resume using 'kubectl attach alpine-7bd47f56bc-kr789 -c alpi
ne-i -t' command when the pod is running
別のPodからServiceに対してリクエストを送って接続できているのが確認できた。
さて、先ほどと同じように /usr/share/nginx/html/index.html を削除してみよう。
$ kubectl exec readiness-check -- rm /usr/share/nginx/html/index.html
しばらくするとReadinessCheckが失敗しているのが確認できる。
$ kubectl describe po/readiness-check | tail
                 node.kubernetes.io/unreachable:NoExecute for 300s
Events:
  Type     Reason     Age                 From               Message
  ----     ------     ----                ----               -------
  Normal   Scheduled  5m                  default-scheduler  Successfully assigned default/readiness-check to minikube
  Normal   Pulling    5m                  kubelet, minikube  pulling image "nginx"
  Normal   Pulled     5m                  kubelet, minikube  Successfully pulled image "nginx"
  Normal   Created    5m                  kubelet, minikube  Created container
  Normal   Started    5m                  kubelet, minikube  Started container
  Warning  Unhealthy  23s (x23 over 45s)  kubelet, minikube  Readiness probe failed: HTTP probe failed with statuscode: 403
先程と同じようにServiceを経由してアクセスしてみよう。
$ kubectl run -it --rm alpine --image alpine -- ash
If you don't see a command prompt, try pressing enter.
/ # wget -O - -T 1 readiness-check-svc
Connecting to readiness-check-svc (10.105.40.233:80)
wget: download timed out
/ # exit
Session ended, resume using 'kubectl attach alpine-7bd47f56bc-j88tr -c alpi
ne -i -t' command when the pod is running
Timeoutしてアクセスできないことがわかる。
ReadinessProbeが通るように /usr/share/nginx/html/index.html にファイルを作成しよう。
$ kubectl exec readiness-check -- sh -c 'echo ok > /usr/share/nginx/html/index.html'
少ししてから再度Serviceを経由したアクセスをしてみる。
$ kubectl run -it --rm alpine --image alpine -- ash
If you don't see a command prompt, try pressing enter.
/ # wget -O - -T 1 readiness-check-svc
Connecting to readiness-check-svc (10.105.40.233:80)
ok
-                    100% |**************************|     3   0:00:00 ETA
Serviceを経由してのアクセスが成功していることがわかる。
このようにReadinessProbeはUnhealthyになったコンテナをServiceのルーティング対象から外す。
再びHealthyになった際は再度ルーティング対象となり、Serviceからのトラフィックがルーティングされるようになる。
参考#
- Kubernetes道場 10日目 - LivenessProbe / ReadinessProbeについて - Toku's Blog
- Podのライフサイクル - Kubernetes
- Configure Liveness, Readiness and Startup Probes - Kubernetes
- kubernetesで動かすコンテナのヘルスチェック - Qiita
- Kubernetes のヘルスチェック(Liveness Probe,Readiness Probe)を検証する - Qiita
- Kubernetesのヘルスチェックで使うLiveness ProbeとReadiness Probeについて - ブロックチェーンエンジニアとして生きる
- kubernetes - k8s - livenessProbe vs readinessProbe - Stack Overflow
- Kubernetesでliveness/readinessProbeのexec commandが実行される流れ - sambaiz-net
- Kubernetes best practices: Setting up health checks with readiness and liveness probes | Google Cloud Blog
- Kubernetes IngressのヘルスチェックにReadiness Probeを使う - ブロックチェーンエンジニアとして生きる
- KubernetesのLiveness ProbeとReadiness Probeの使い分けを考えたけど結局思いつかなかったや - Mitsuyuki.Shiiba